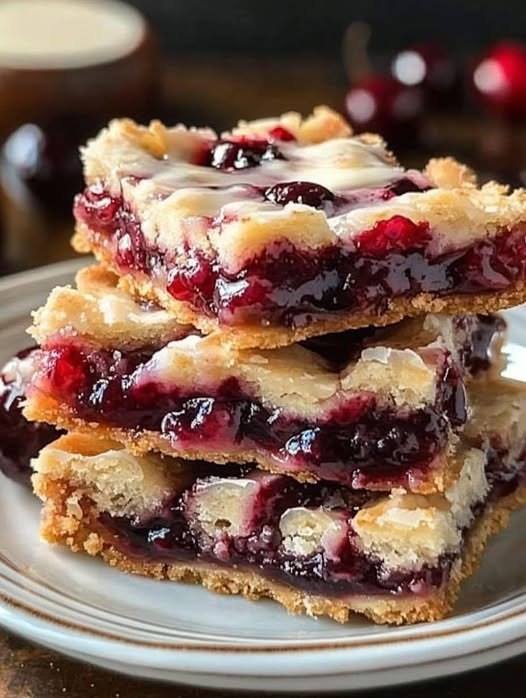
Why These Cherry Pie Bars Are Perfect for Birthdays
Cherry pie bars are a fantastic alternative to cake, especially when serving a crowd. They’re easy to slice, simple to transport, and don’t require utensils, making them perfect for parties. Plus, their vibrant red cherry filling adds a festive pop of color to any celebration table.
You’ll love this recipe because it’s:
- Easy to prepare with simple ingredients
- Great for feeding a large group
- Perfectly balanced between sweet and tart
- Ideal for make-ahead baking
Ingredients
For the crust and topping:
- 1 cup unsalted butter (softened)
- 1 ¾ cups granulated sugar
- 4 large eggs
- 1 teaspoon vanilla extract
- 3 cups all-purpose flour
- ½ teaspoon salt
For the cherry filling:
- 2 cans (or 3 cups) cherry pie filling
- 1 teaspoon almond extract (optional, enhances flavor)
Optional glaze:
- 1 cup powdered sugar
- 2–3 tablespoons milk
- ½ teaspoon vanilla extract
Instructions
Step 1: Prepare your pan
Preheat your oven to 180°C (350°F). Grease a 9×13-inch baking dish or line it with parchment paper for easy removal.
Step 2: Make the dough
In a large bowl, cream together the butter and sugar until light and fluffy. Add eggs one at a time, mixing well after each addition. Stir in the vanilla extract.
In another bowl, whisk together flour and salt. Gradually add the dry ingredients to the wet mixture until a soft dough forms.
Step 3: Form the base layer
Spread about two-thirds of the dough evenly into the prepared baking dish. This will serve as the base of your cherry bars.
Step 4: Add the cherry filling
Spread the cherry pie filling evenly over the base layer. If using almond extract, gently mix it into the filling beforehand for a richer flavor.
Step 5: Add the topping
Drop spoonfuls of the remaining dough over the cherry layer. Don’t worry about covering it completely—the gaps allow the filling to peek through and create a beautiful pattern.
Step 6: Bake
Bake for 35–40 minutes, or until the top is golden brown and the filling is bubbling slightly.
Step 7: Cool and glaze
Allow the bars to cool completely in the pan. If desired, whisk together powdered sugar, milk, and vanilla to make a glaze, then drizzle it over the cooled bars.
Tips for Perfect Cherry Pie Bars
- Use quality cherry filling: A good filling makes all the difference in flavor.
- Don’t overbake: Keep an eye on the bars to ensure they stay soft and moist.
- Cool completely before slicing: This helps the bars hold their shape.
- Line your pan: Parchment paper makes removal and cleanup easier.
Variations and Creative Twists
These cherry pie bars are incredibly versatile. Here are a few fun ways to customize them:
- Mixed Berry Bars: Combine cherries with blueberries or raspberries.
- Chocolate Cherry Bars: Add chocolate chips to the dough for a rich twist.
- Nutty Crunch: Sprinkle chopped almonds or walnuts on top before baking.
- Lemon Glaze: Replace vanilla glaze with a tangy lemon drizzle for contrast.
Serving Ideas
These bars are delicious on their own, but you can elevate them even more with:
- A scoop of vanilla ice cream
- A dollop of whipped cream
- A dusting of powdered sugar
- Fresh cherries for garnish
Serve them slightly warm for an extra comforting dessert experience.
Storage and Make-Ahead Tips
- Room Temperature: Store in an airtight container for up to 2 days
- Refrigerator: Keeps fresh for up to 5 days
- Freezer: Freeze individually wrapped bars for up to 2 months
To serve after freezing, simply thaw at room temperature or warm in the oven for a freshly baked taste.
Nutritional Highlights
While these bars are definitely a treat, cherries do provide some nutritional benefits. They’re rich in antioxidants, vitamin C, and natural compounds that support overall health. When enjoyed in moderation, these bars can be part of a balanced diet.
Final Thoughts
Delicious Cherry Pie Bars are the ultimate crowd-pleasing dessert for birthdays and celebrations. They combine the nostalgic flavor of cherry pie with the ease of a bar dessert, making them both practical and indulgent. Whether you’re baking for a party or just treating your family, this recipe is sure to be a hit.
Once you make these once, they’ll quickly become a go-to dessert for every special occasion—simple, beautiful, and absolutely delicious in every bite. 🍒